
Glass Etching Cream
A glass etching cream compound defines and highlights the cuts made on the glass surface. You can create permanent etched designs on windows, mirrors or glassware by using this cream. Once you are able to create a smooth, matte surface, you can decorate the surface by adding colors. The etching effects that you see on glass are achieved due to the properties of the chemicals used in this cream. This glass etching cream contains a mixture of diluted sulfuric acid, sodium bifluoride, barium sulfate and ammonium bifluoride. While this glass etching cream doesn’t create a very detailed or defined etched patterns, using this is relatively safer.


Glass etching cream is a combination of screen printing and glass chemical etching principle of the screen printing, has the traditional etching method of frosting incomparable advantages.
Advantages of Glass Etching Cream
Good adhesion
It has good adhesion to glass or film, no diffusion, no shrinkage, no bubbles after printing, and the etching rate reaches more than 90%.
Economical
Save labor, reduce material consumption, and improve product competitiveness.
Environmental protection
There is no large amount of waste acid and alkali treatment and emissions, and optimized, environmentally friendly, and highly operable.
Safety
This product has good hydrophilicity, and the equipment in contact with it can be cleaned with tap water, avoiding the harm to people and the environment caused by traditional cleaning methods with economical liquids.
Why Choose Us
High quality
Our products are manufactured or executed to a very high standard, using the finest materials and manufacturing processes.
Advanced equipment
A machine, tool or instrument designed with advanced technology and functionality to perform highly specific tasks with greater precision, efficiency and reliability.
Professional team
Our professional team collaborates and communicates effectively with each other, and is dedicated to delivering high quality results. We are capable of handling complex challenges and projects that require our specialized expertise and experience.
Quality control
We have built a professional quality control team to accurately inspect every raw material and every production process.
Customized services
We understand that each customer has unique manufacturing needs. That's why we offer customization options to cater to your specific requirements.
24H online service
We try and respond to all concerns within 24 hours and our teams are always at your disposal in case of any emergencies.
How to Use Glass Etching Cream
Glass etching cream is an easy-to-apply medium that, when applied to glass through a stencil or silkscreen design or directly to glass, will actually etch a frosted design into the surface. Glass etching cream can be applied to most glassware, glazed ceramics, mirrors, and porcelain. First, wear protective gloves in order to avoid direct skin contact. Simply twist off the lid and squeeze a small amount out to load a palette. A generous, even thickness of glass etching cream can then be brushed directly onto an etch-able surface, or applied through a stencil, a silkscreen, or brushed within taped areas. Make sure all exposed areas to be etched are coated. It is very important to make sure the stencil or silkscreen is completely making contact with the surface. Adhesive backed stencils and silkscreens work best; however, a spray stencil adhesive or stencil tape can be used to adhere the stencil to your surface. If taping off a pattern, be sure to fully secure the edges of the tape lines to prevent the etching cream from spreading. Whichever method you choose, make sure to press firmly the design onto your surface. Once applied, allow etching cream to rest 15 minutes. If desired, after ten minutes, brush to swirl glass etching cream over the area being etched to ensure an even etching, then allow the cream to rest the remaining five minutes. Next, rinse the surface well under running water to remove etching cream. Continue to flush the sink with running water for two additional minutes. Remove stencils, silkscreens or tape to expose etched designs; dry surface. Be sure to rinse glass etching cream thoroughly from stencils and tools immediately after use.
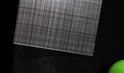
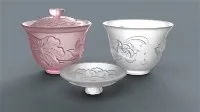
Glass etching cream is a fast acting compound that lets you create permanent etched designs on surfaces like windows, mirrors, or glassware! The chemicals in glass etching cream permanently “etch” the glass with micro-scratches to give it a frosted appearance which also happens to be dishwater and food safe!I recently had my first experience using glass etching cream to create this checkered glassware set. Because glass etching creams are comprised of a diluted mixture of chemicals that lightly “eat” away at the surface of the glass. The mixture is comprised of the hazardous chemicals: Barium Sulfate, Sulfuric Acid, Sodium Bifluoride, and Ammonium Bifluoride. All these chemicals are harmful to bare skin and can irritate or even burn it if not washed off immediately. So you'll need to wear latex gloves, glasses and a long sleeve shirt to ensure your skin is safe from any contact. Glass etching cream can be used on numerous surfaces such as glass, mirrors, porcelain, and glazed ceramics. The time for how long the glass etching cream needs to stay on the material in order to etch it may vary depending on the surface and cream you're using. Keep in mind, it may take off any protective layers, such as the glaze on ceramics. You can etch on most types of glass, except some glass Pyrex bakeware that has been tempered for high heat. First frost, then add colour. Do not mix the dye with the etching cream, because the etching cream has to be rinsed off after the etching process is finished, the colours will not stick. These products are not recommended to come to contact with unwrapped foods. If you wish to colour a food container, do it outside of the glass where food doesn't meet it. Do not wash your tinted etchings in the dishwasher, with soap or with any kind of commercial glass cleaners.

Use isopropyl rubbing alcohol to clean the glass surface before beginning. Make sure there are no smudges or fingerprints on your glass before applying. Do not use common glass cleaners as they may have additives that leave a thin (almost invisible) layer that may cause uneven etching. Most etching instructions recommend using paint brushes, this is what I used and it seemed to work fine, however a lot of etching experts recommend using popsicle sticks to get a nice even thick layer. If you do use a paint brush, ensure you're patting the product on rather than painting it on to avoid brush strokes. Because the glass doesn't always etch evenly imperfections are much more obvious in large areas. So for best results keep the area you're etching on the small side! While drying, use a popsicle stick to gently move around and tap the etching cream to avoid any air bubbles from leaving any spots or uneven etching. Once you are finished, you can scrape off the excess etching cream and put it back into the container. You can wash the etching cream off directly into a stainless steel sink without harming the sink. But if you have a porcelain sink, I would recommend placing a bucket in the sink to wash the cream off into. Make sure that both your glass and stencil are at room temperature before using it. Glass with a high leaded content can be hard to etch. The easiest way to identify if your glass has a high volume of lead is by tapping it gently with a knife. iI it makes a drawn-out chiming sound, it's likely this glass has a high lead content. Regular glass tends to make a duller, briefer sound when tapped.

Glass etching cream contains chemicals such as ammonium bifluoride or sodium bifluoride, which are capable of etching or corroding glass surfaces. These chemicals work by reacting with the silica in the glass, creating a rough, frosted appearance. The process of glass etching cream involves the removal of a thin layer of the glass surface, resulting in a permanent change to its appearance. It's important to handle glass etching cream with care and follow safety instructions, as the chemicals involved can be hazardous if not used properly. The glass etching cream has a chemical substance in it that dissolves the molecular bonds within the glass - that substance is called hydrofluoric acid. Now, glass is composed primarily of silicon and oxygen. What happens when the etching cream is applied to the glass is that the fluorine atoms in the acid react with the silicon atoms in the glass, breaking their bonds to the oxygen atoms in the glass and causing the molecular structure of the glass to fall apart. A weak solution of the acid (as in the cream) causes an etching to form; a stronger solution of the acid could very well dissolve the entire piece of glass.
How to Dissolve Glass Etching Cream Crystals
Glass etching cream is also widely known as acid cream and is one of the easiest ways to personalize your glass. It is fairly inexpensive, but a jar doesn’t go a long way since you have to coat your glass with a thick layer to etch it correctly. The cream has a diluted mixture of chemicals which eats or etches the surface of the glass very lightly. The mixture is comprised of the hazardous chemicals: Barium sulfate, sulfuric acid, sodium bifluoride, and ammonium bifluoride. It is used mostly for etching designs into glass cups and wine glasses, but can be used for many other things also. Vinyl decals are cute, but glass etching is permanent and dishwasher safe, so it definitely holds up better long term. When you etch designs, they last forever. This is especially helpful for drinking glasses or glass baking dishes that you want to use every day. Glass etching cream contains small crystalline particles. These may coagulate due to naturally occurring phenomena in etching cream where crystals attract and bond to each other. If these formations in the etching cream become a problem, the crystals can be dissolved as follows.Tightly close the cap to the bottle. Place the bottle in very warm water (approx. 110° f). Leave the bottle in the water for 90 - 120 minutes (depending on the volume of crystals). Remove the bottle from the water and shake it to reblend the contents every 15-20 minutes. Never add water to the etching cream. Remove the bottle from the warm water and shake it well. Dry the bottle off to remove all moisture from the outside of the bottle. Unscrew the cap off the bottle. Stir the contents of the bottle with a wooden stick. You will want to mix the cream until it is as consistent as possible. Never use a metallic spoon or another metallic instrument to stir the etching cream. As the etching cream is applied to your project surface, the cream should be gently moved around on the glass with your application tool. Larger crystal chunks that have not been resolved can be gently removed from the stencil and returned to the bottle or discarded.
Glass etching cream contains chemicals such as ammonium bifluoride or sodium bifluoride, which are capable of etching or corroding glass surfaces. These chemicals work by reacting with the silica in the glass, creating a rough, frosted appearance. The process of etching involves the removal of a thin layer of the glass surface, resulting in a permanent change to its appearance. It's important to handle glass etching cream with care and follow safety instructions, as the chemicals involved can be hazardous if not used properly. The etching cream has a chemical substance in it that dissolves the molecular bonds within the glass - that substance is called hydrofluoric acid. Now, glass is composed primarily of silicon and oxygen. What happens when the glass etching cream is applied to the glass is that the fluorine atoms in the acid react with the silicon atoms in the glass, breaking their bonds to the oxygen atoms in the glass and causing the molecular structure of the glass to fall apart. A weak solution of the acid (as in the cream) causes an etching to form; a stronger solution of the acid could very well dissolve the entire piece of glass. It is glass that has been treated with hydrofluoric acid (HF), which is able to dissolve glass. The glass is first covered with a resist a material that will not react with the acid—at least, not very quickly. Then the resist is removed in areas where the desired design is to be, and the glass is exposed to fumes from a solution of HF. A gel that contains HF is painted onto the glass in the desired pattern. In either case, after the acid has done enough to the glass, giving it a frosted look it (and the resist, if any) is cleaned away, to display the acid-etched glass.
FAQ
We're well-known as one of the leading glass etching cream manufacturers and suppliers in China for 25 years. Welcome to buy high quality glass etching cream made in China here from our factory. For price consultation, contact us.
engraved glass effect cream, wholesale glass etching cream, special glass etching cream